People who have black thumbs or who are not consummate gardeners still can have difficulties growing aloe vera. That is because they forget that this desert succulent does not need a whole lot of water. As a result, they may get a bit too heavy-handed when it comes to watering.
To make sure your aloe vera thrives, you need to remember that this desert succulent can live and thrive better when it does not receive to too much moisture. Adding too much moisture can lead to fungal diseases or can cause the plant to lose its color and fade.
Put Away Your Spray Bottle and Watering Can
For anyone who normally waters his or her plants, this fact may, at first, throw them off-guard. While some plants need water to flourish and grow, the same is not true for an aloe vera plant. In fact, overwatering is the main reason most aloe vera plants die. Overwatering causes disease or conditions that take the life out of this desert succulent. That is why you need to put away your watering can and spray bottle when caring for this plant.
Aloe vera plants can easily tell you when you are doing something wrong, as they will show off brown spots, or indicate they are sickly with limp leaves and faded hues. To make sure you don’t see these tell-tale signs of neglect, you need to learn the steps required to take care of an aloe vera plant.
Take Care of Your Aloe Inside
To begin your journey, it is best to begin taking care of the plant inside. That is because this succulent makes an excellent indoor companion, especially for people who don’t consider themselves to be green-thumb gardeners.
When the plant is cared for properly, you can also use the juice from the leaves to soothe cooking burns or a child’s scrapes, when applied topically. Just don’t ingest the gel, as doing so can be toxic. Even a little bit of the gel, ingested, can lead to a stomach upset.
Avoid Direct Sunlight
This succulent plant, which hails from the species, aloe, is typically short-stemmed, and displays greenish and fleshy leaves, all which fan out from a central stem. Margins on the leaves feature serrations with small teeth. Before you buy an aloe plant, you will need to find a spot that provides bright yet indirect sunlight. Don’t place the plant directly in the sun, as doing so dries out the plant and causes the leaves to turn yellow or brown.
Preferably, you may want to plant the aloe in a pot near a kitchen window – one that brings in the sun, but does not do so directly. You may find a similar spot in a den, dining area, or bedroom. Once you have determined a place to set your aloe vera plant, you need to choose a planter.
6 Tips To Grow Aloe Vera for Beginners
How to Choose a Container
Usually, a planter made from terra-cotta or a material that is similar is best. Terra-cotta is suggested as it allows the medium you use to dry thoroughly before the next watering. The pot should be heavy enough to stabilize the plant. If you use a pot that is glazed or plastic, it will hold more moisture – something you should avoid as a beginning aloe gardener.
Make Sure the Pot Is as Wide as It Is Deep
When selecting a container, find a container that contains more than one drainage hole, or at least one hole to drain out the water. You want to remove any excess water, as standing water or soil that is too damp will kill a plant. The container you choose should be as wide as it is deep – deep enough so you can plant the plant’s stem beneath the media.
Use a Media that Drains Well
For the beginner, a well-draining potting mix is the best choice, such as one designed specifically for succulents or cacti. Never use just regular potting soil. A good potting mix should contain coarse sand, lava rock, granite rock, and/or perlite. While an aloe vera plant is considered hardy, too much water and not enough drainage simply do not support plant health. A plant will rot, wilt, and die when the wrong media is used.
Remember that you do not need to add drainage accessories, such as clay balls or gravel. You just need to make sure that the pot can drain. Those other add-ons only take up space – space that your roots need to use to thrive and grow deep.
Preparing the Plant’s Pot for Repotting
To prepare the aloe vera for planting or repotting, you need to give the container a quick cleaning. Scrub the pot well if you have already used it. Make sure the container dries thoroughly before you use it. Place a small piece of screen over the drainage hole so the water will drain properly.
Remove the aloe plant from its current container, gently brushing away any excess dirt from the plant’s roots. Do not use a lot of force – you may damage the roots. If your plant currently has pups or shoots, you need to remove them as well.
Is the Stem Spindly? How to Correct It
Trim the stem on the plant if it is spindly and long, leaving as much as you can. Take your bare plant and place it an area that attracts warm and indirect sunlight. Doing so will permit a callous to form and heal the plant.
When you have your plant ready to plant, fill the container about one-third full of the well-draining potting soil, designed for succulents. Continue to fill the pot with the mix around the plant. Leave about three-fourths inch between the rim of the container and the topsoil. To make sure you have it right, the bottom leaves of your aloe plant should rest just above the mix. Never water a plant after you have planted or repotted it.
In fact, you should not give your newly planted aloe water for about a week. This will greatly reduce any chance of fungus root rot from developing, and give the plant time to grow new roots. Until you establish the plant, keep it in a spot that receives indirect and bright UV light. Never allow an aloe to sit in a lower-light room, as doing so can cause your aloe plant to grow leggy.
The Best Temperatures for Your Plant
An aloe vera plant thrives best in temperatures between 55 degrees and 80 degrees Fahrenheit or 13 degrees and 27 degrees Celsius. Therefore, indoor growing is ideal, as you will find the thermostat set at these levels in most homes.
Bringing the Plant Outdoors
If you want to bring your plant outdoors, regardless of the locale, it is best to do so between the months of May and September. If the evening is chilly, however, you should set the plant indoors.
Always Remove the Water from the Saucer
When you do water your aloe vera plant, do so deeply. To discourage root rot, you should wait for the media to dry at least two inches before watering again. Again, never allow your aloe vera plant to stand in water. Even if you have a hole at the bottom of the container and a saucer to catch the water, remove the water.
Water your plant about every three weeks in the summer and about every five weeks during the winter. Use your finger to test the media’s dryness before you water the plant. If the potting mix remains too damp, the plant’s roots will start to rot.
Fertilize the Plant Monthly
To fertilize the plant, do so sparingly, or about every four weeks. Also, only fertilize the plant with a blend or time-released pellets in the spring and summer.
Removing and Replanting the Pups or Babies
When removing and replanting the pups or offsets, you need to find where the new plantings are attached first. Remove them with a sharp knife, scissors or pruning shears. Each pup should display at least an inch of stem.
The pups should sit outside of any media for several days. Doing so permits each pup to develop a callous over its cut. This protects the baby planting from rot. Like mature plants, keep the pups in a warm location that attracts indirect but bright UV light.
Once the callouses from on the pups, pot the plantings in a succulent potting mix in a pot that allows for adequate drainage. Keep the new plantings in a sunny spot. Like the mature aloe plant, don’t water the pups for about a week, keeping the media dry.
Getting Your Aloe Plant to Display Flowers
Some mature aloe vera plants produce flower spikes, also known as inflorescences. From this spike bloom dozens of red or yellow tubular blossoms – another reason you want to make sure you are treating your aloe well.
To make sure your aloe flowers, do the following:
- Provide the plant with as much indirect sunlight as possible, particularly during the spring and summer. Pay special notice – do not move your aloe from the indoors to the outside right away. Make sure it has time to acclimate to the harsher outdoor light. Also, the plant can get sunburned by making any sudden moves. Instead, your aloe should remain partially shaded for about a week before introducing it to more sun.
- Don’t allow your aloe to dry out completely. While too much water is certainly not good, you want to make sure the plant gets just the right amount of moisture. Don’t allow you plant to sit outdoors if your area is hit by consistent rainstorms.
- Give your plant the correct level of dormancy during the winter and fall. Aloes tend to blossom in the late part of winter or early spring. Therefore, during its period of rest, water the plant less and provide it with cooler temperatures.
Despite your best efforts, your aloe plant may still not flower. Usually, it is harder to get indoor plants to bloom. Therefore, don’t allow this fact to keep you from trying.
How to Make My Aloe Vera Bloom
Learn More about the Diseases and Pests
Most aloe vera plants are damaged by plant pests, such as scale or mealy bugs. Some of the common diseases, which usually result from overwatering, include the following:
- Root rot
- Soft rot
- Leaf rot
- Fungal stem rot
As you can see, even gardening neophytes can have their problems with the hardiest of plants. That is why you need to make sure you don’t overwater your plant. When an aloe vera plant is healthy, its leaves are juicy and plump – filled with the gel that soothes burns and cuts.
What to Do about Brown Spots
One of the signs of excess watering is a display of brown spots. These dark warnings appear on the plant’s leaves. Again, only water the plant when the top inch of soil is completely dry. Keep the plant well- drained by using a drain-friendly medium, such as sand, perlite, peat moss, or a potting soil designed for cacti and succulents.
Never trap your plant in a clay soil mix without any drain holes in the pot, as you are setting it up for disaster. Also, make sure that the saucer sitting beneath the plant’s container is free of water. Any rot that the plants contract results from too much dampness.
How to Take Care of a Plant that Has Root Rot
If you suspect your plant has been overwatered, act quickly. Remove the plant from its pot and examine the roots. If the plant has root rot, cut out the roots that have been affected and repot your plant in a well-draining sand and perlite or succulent soil mix. As long as the unaffected roots stay healthy, your plant will continue to survive.
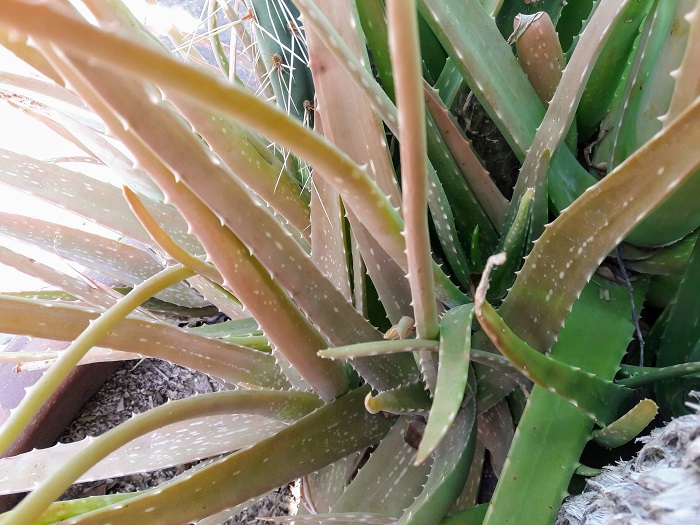
Brown Leaves or Spots also Appear on Sunburned Plants
Brown leaves or spots also indicate that you plant may have sustained a sunburn. This is noted when the leaves turn reddish or brown at the tips or brown spots or sunspots appear on the leaves. The leaves also become a faded green.
How to Treat a Sunburned Plant
If you find that your plant is suffering from the ill effects of the sun, you need to place it out of the direct aim of the rays. To do this, you need to place the plant in the middle of a table for a few days. If your plant has been receiving artificial light, you need to place a greater distance between the plant and the bulb. If the plant still continues to brown, place it in an area that receives indirect natural light.
If your plant has gotten too much sun, it may also need water. That because aloes that receive too much sun are normally low on water. Although you don’t need to give the plant a lot of water, you still need to check the top part of the soil. If it is completely parched or dry, it is safe to water the plant.
When you see brown spots, they usually indicate overwatering, too much sun, or a lack of H20. If you remove your plant from the direct rays of the sun and it still appears sickly, it may be drying out. Water reaches leaf tips last. Therefore, the leaves will turn brown first.
How to Make Sure You are Doing Things Right: A Quick Review
1. When you are dealing with aloe vera, you need to be cautious about giving it water as well as too much sun. To ensure your plant’s health, place the plant in a spot that receives the sun, but does so indirectly. You also want to water the plant when the top first inch of the soil or medium is completely dry.
2. Always make sure that your aloe plant rests in well-drained soil or media, and that you place it preferably, in a terra cotter container. Don’t permit water to stand in a saucer beneath the plant, as doing so can lead to root or fungal rot, or one of the other types of fungal diseases.
3. To keep everything in balance, your aloe vera plant should sit in indirect sunlight, receive a weekly watering, and only be planted in containers that feature drain holes.
Side Bar
Troubleshooting and Equipment
Aloe Vera Plant Problems and What to Do About Them
1. Mushy stems. This problem results for overwatering the plant, and now the plant is rotting at its base. You can save your plant if the rot has just begun, the stem is still healthy. However, act fast! Trim the stem from just above the rotted part, and try to propagate. Make sure all the rot is removed. Otherwise the rotting will continue.
2. Brown leaves. Check the stem’s health. It should be healthy and firm. If the brown leaves are dry or withered, your plant is actually too dry. If they are brown and mushy but the stem is still in place, remove the mushy leaves at the point where they are connected to the stem. Stop watering until the media or soil is completely dry.
If the leaves are dry or shriveled, add more water. Simply trim off the dry brown leaves to maintain the plant’s continue health.
3. The plant looks too tall and thin. You plant is not receiving enough light. Either add a grow light or move the plant to a sunny window where it can receive the indirect rays of the sun.
4. Mold in the soil. Stop watering the plant. Remove the mold and check the stem. If the stem is too soft, the plant probably cannot be salvages.
How Do I Plant My Aloe Vera Outside?
If you live in the US Southwest, or USDA zones 8 to 11, you can grow aloe vera outside during the warmer times of the year. However, it is best to move the plant inside in the winter. Remember that aloes grown well in poor soil, as long as the soil is gritty and loose and offers good drainage. Make sure the plant receives the full sun at least for six hours. Because the plant stores water in its leaves, it remains hardy, even during drought conditions.
When you place your aloe outside in the right zone, it will not need any special type of care, as long as you place it in a sunny site that receives indirect light. Apply protection at night if you keep the plant outside. For short cold spells, use a plastic container. Otherwise, apply a thick straw around the plant’s base to protect its roots. Never leave the plant outside if cold periods last for several months. In this case, keep your aloe in a pot, and simply move it inside to warmth.
Gradually expose the aloe to the sunlight when moving it outdoors to prevent sunburn, enabling the plant to acclimate itself to the new environment. You can bring an aloe plant from the inside to outside that is planted in a pot, or you can transplant the plant. However, for long cold periods, you will eventually need to move the aloe to a warm inside location.
Required Equipment
To make sure you don’t overwater the plant, buy a moisture meter. Without the presence of this instrument, care can be difficult for less experienced gardeners. If you want to keep the plant’s sword-like leaves healthy and prevent root damage at the same time, a moisture meter can save your plant.
Good watering methods require the use of a well-draining media. A cactus soil or a succulent mix works the best. Drainage holes in the pot should be plentiful and open. If the pot is tall, place some pebbles or small pieces of aggregate at the bottom two inches (5 centimeters) of the container.
How to Check the Moisture
When checking the moisture, testing the dryness of the soil is the best guide. As a general rule of “green” thumb, an aloe that sits in a container with a six-inch diameter should be watered when the top two inches feel dry to the touch. Any plant in a container measuring eight to 10 inches wide should be watered when the top inch of the soil feels dry.
In most instances, the soil should be dampened six to 12 inches toward the root zone. Sandy soil, however, drains fast, and should be watered when the soil is dry up to four inches toward the root zone.
Some Final Tips Worth Noting
Keep the following in mind, whether you are a beginning or inveterate gardener:
- Aloe vera is a succulent. Therefore, make sure you use a fast-draining media.
- Aloe roots deep. Therefore, never use a shallow container. You need to give the plant plenty so its roots can grow downward.
- Wait until the pups or babies are a decent size before you remove them.
- Never place your plant in the hot sun after it has been repotted. While it is good to give your plant some sun – you don’t want it to receive too much direct UV light.
- Don’t water you plants too much. Water the babies or pups about every three weeks. Water the mother plant thoroughly about every two months after it has been established.
One Final Comment
When you follow the above guidelines, your common sense will guide your when treating the plant for root rot, or making sure it receives the right amount of sun or water. Just make sure to treat our plant as the succulent it was meant to be, and you will experience fewer problems.