Over 400 species of plants represent the family of Aloe, with the aloe vera plant being the most popular form. The easy-to-grow succulent thrives well indoors or in a space outdoors in indirect sunlight. As long as you provide water, on occasion, and well-draining and gritty soil, your plant will provide you with years of enjoyment and satisfaction.
Only Adult Plants Bloom
Aloe vera plants will bloom. However, in this case, you need to have patience. Only the adult plants, which are at least 4 years old, blossom. Therefore, if you plant is not blooming, it may not be an adult or reached this stage in its life.
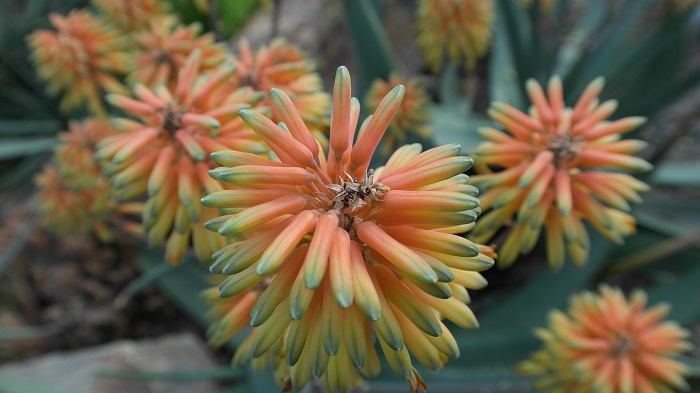
Blooms from the aloe vera plant emerge from an inflorescence that soars over lovely rosettes. However, with that being said, flowers on aloe plants may not appear if the aloe plant is grown indoors. Indoor plants grown in full, yet indirect, sun have the best chance for showing off blooms.
The Best Temperatures
Therefore, to get your aloe to bloom, move it outdoors once the temperatures warm and any chance of a freeze is over. The best temperatures for blooming range from 70 degrees to 85 degrees on the Fahrenheit scale or 21 to 29 degrees Celsius during daytime hours. The temperature should not fall any lower than 60 degrees Fahrenheit or 15 degrees Celsius at night. Therefore, you may have to move your plant indoors during cooler weather.
If you keep your aloe inside, find a place, such as a sunny window sill, for your plant. While some plants love shady locations or have a hypersensitive response to light, aloe likes the sun. Just make sure your plant does not receive too much sun or too little light. The leaves on the plant, when exposed to too much sun, become wrinkly and display brown sports – a sure sign the plant is in poor health.
Fertilizing the Plant
One of the best ways to encourage blooming is to fertilize the aloe plant. Use a balanced fertilizer during the months of early spring or late winter. Water the plant after fertilization. Doing so causes added salts to drain from the container – substances that can injure the plants delicate roots. Also, this is important – don’t’ add any fertilizers that promise blooming that contain high amounts of phosphorous or feature super phosphate formulas. Phosphorous, when concentrated, can damage the plant.
An excess salt build-up can burn the roots. Either the soil must be leached with extra water or you should repot the plant. An aloe vera plant does not require much feeding. Feed the aloe vera about once monthly, using a diluted yet balanced mix.
Choose a Liquid Fertilizer
While aloe plants in garden settings can get by with a single drenching of a fertilizer in the spring, potted aloe plants require applications more often, or, as stated, about once a month. Use a liquid fertilizer, or a 10-40-10 houseplant mix. You can also use a mix made especially for succulents. Choose a liquid fertilizer over a granular mixture. If your aloe vera plant is a container plant, water it the day before fertilization. Doing so will flush out lingering salts or lower the chance to leaf tip burn.
If you are not sure about the amount of fertilizer, always use less. Aloe plants need little nutrients, although a small boost will support blooming. Too much fertilizer will overwhelm an aloe plant.
Using the Gel as a Fertilizer
You can even use aloe vera gel, itself, as a fertilizer – one that can also encourage blooming. To make fertilizer from an adult plant, collect the gel from aloe vera leaves. Take a small container and add a layer of soil. Add the gel (about 80%) with seaweed (20%). Sprinkle a couple drops of water onto the mix and place a lid over the container before tightly sealing it. After a week, open up the container and stir the mix, using a spade. Stir the mix every couple days, during the week, before adding it to the soil of aloes and other plants.
If you grow aloe vera in a container, transplant it about every two years to aerate the root system and provide fresh soil. Use small containers, providing the plant with about 1.5 inches of space toward the edge of the pot. Aloes prefer to be housed in tight living spaces, as the dense root mass that results promotes blooming.
While the aloe vera prefers sunlight, you don’t want to directly place it in the path of UV rays. Doing so, as noted, can sunburn the leaves. A sun scorched plant will eventually recover and will bloom, provided it is moved into a more aloe-friendly location.
Aloes Bloom in the Spring
Just remember that aloe vera plants are made for desert climates. Therefore, you need to make sure the climate is conducive to growing and blooming. Along with waiting for your aloe to mature and giving it plenty of indirect and natural sunlight, you need to check the blooming schedule. Aloe vera plants only bloom at certain times of the year, not year-round. Expect to see blooms each year in the early spring. If you do not see buds during the winter, it simply is not the right time for flowering.
The best way to get an aloe vera to bloom is to make sure it remains healthy. Review the steps needed to keep your aloe vera well-maintained. For example, the soil should contain adequate nutrients. Again, fertilizing the plant will replenish the soil’s vitamin and mineral content. Repotting can help too, giving the plant new nutrients and new soil.
Propagating aloe vera plants will also encourage blooming. The aloe vera plant features pups that grow off the primary plant. Remove these pups if you want to see a flowering plant. By removing the extra bulbs or pups, you will give the main plant the additional energy needed to produce beautiful and tall spiky stems of aloe vera flowers.
Pamper Your Plant
If you have not gotten your aloe vera plant to bloom yet, do not despair. You just need to experiment a little with various techniques. Remember, the plant needs to be an adult, or about 4 years old. You also need to make sure that the temperature is right and that the plant does not receive too much sun. Pamper your aloe vera plant and treat is gently so you can see its lovely blooms.
If you grow the plant indoors, it will probably need additional coaxing. The spiky and vibrant yellow flowers can indeed be seen, if all the conditions are right. The blooms, which appear in the early spring, and can grace your garden or home throughout the summer months.
Take the Plant Outside
Young aloe vera plants just are not prepared to bloom. Therefore, place only adult plants outside if you want to witness big bright flowers. Taking the plant outdoors will allow it to receive adequate amounts of sun while the wind and bee activity will pollinate the plant’s spiky and long stems.
Remember, the fleshy and notable stems of the plant scorch when temperatures get too hot (or around 110 degrees Fahrenheit). Therefore, be careful about placing any plants in a desert climate in the full sun or planting them in black pots. Black absorbs heat. Therefore, your plant can get a sunburn if you plant it in this type of container.
Flowers Bloom on Healthy Well-rested Plants
Because transplanting plants makes blooming easier, it is good to know the plants can easily be transplanted. The hardy succulents can also spend some time outside a pot without any ill effects. The spiky and thick-petaled yellow flowers that bloom at the plant’s base will only grow on plants that have been well-rested. Once you transplant the plant, you may have to wait about one or two years for flowering.
Some people believe that the aloe vera plant dies after it shows off its blooms. However, this is a mistaken notion. Actually, agaves are the desert plants that die after blooming. An aloe vera plant will continue growing after its stalk blooms. You can either allow the flower stem to die or cut it off.
While an older aloe vera plant starts to look spidery after some time, it still will create new centers of growth at its base. A south- or west-facing area outdoors along with slightly sandy oil contribute to better growing conditions. These conditions make it possible for aloe veras to bloom outside or in a pot.
Again, transplanting or repotting can assist in flowering. An adult aloe tends to get root-bound, and aloe plants can grow and expand, causing overcrowding. When this happens, you should always repot your plant, especially if it begins to develop pups. These offshoots of the mother aloe plant are still part of the primary root system, but can still live separately as full plants. If your plant looks leggy, droopy, or spidery and features pups, you need to transplant.
Remove the aloe vera plant form its container and pull any pups from the root mass. If the plant is rootbound, use a knife to separate the roots. Don’t worry about hurting the plant, as it is indeed tough and the roots will not get injured when cut apart. As long as each pup is attached to some roots, it should grow fine on its own.
Patience is a Virtue
The above information will guide you into growing aloe that not only thrives but which flowers each spring. You just have to be patient during the process. Unlike other plants, aloes take their time when it comes to flowering. However, when the plants do bloom, it is well worth the effort.
Once you get your aloe vera to flower, you will feel accomplished as a gardener. Remember – patience is a virtue. This is especially true when it comes to flowering aloes. Experiment a little and stay focused on your goal. As long as you nurture the plant and maintain the right conditions for flowering and growth, you will realize success.
Reviewing the Steps for Flowering
Ideally, flowering will take place if you do the following:
1. Remove the pups from you plant. Cut the connection, using a sharp knife. Allow the babies to dry 24 hours before you replant them in new potting. The pups take the energy from the mother plant, needed for blooming.
2. Repot your adult aloe vera in the autumn. Choose a pot that is about three times the width of the old pot. Remove the aloe vera from its current container and add it to the new pot in a mix of 2 parts potting soil and 1-part perlite. Water thoroughly after tamping the soil around the plant’s roots.
3. Place the aloe vera plant in a brightly lit room, preferably a south-facing window. Make sure it receives a large amount of natural light. However, don’t sit the plant in an area where it receives so much direct light that it burns.
4. Dampen the soil with water when the top inch of the dirt is dry. Do not overwater – permit the soil to completely dry out before watering again. Watering, when done properly, encourages blooming.
5. Fertilize the plant, preferably in January with a diluted 10-40-10 liquid fertilizer. You can also make your own fertilizer, as noted above, using the aloe vera gel from the plant. However, don’t use the gel until later, or until after you use the 10-40-10 liquid fertilizer, and see the results. Time is of the essence when it comes to blooming. Therefore, use the liquid first and test out the aloe vera fertilizer on your younger plants.
6. Always fertilize after you water the plant so you don’t damage the roots. Otherwise, you will defeat the whole purpose of fertilizing the plant.
7. Keep the daytime temperature set around 70 to 85 degrees on the Fahrenheit scale. The warmth is need to encourage the stalks to grow. If the ambient temperature falls into this range, place the plant outside.
8. Fill a tray with water and pebbles. Place the pot of aloe vera onto the tray so you can add some humidity. This added humidity is helpful for flowering.
9. Set up a small fan to circulate the room’s air. Added ventilation discourages the growth of mold and mildew and prevents pests, such as spider mites, from infesting your aloe vera plants.
Final Care Tips
Aloe vera features spines. Work carefully when repotting the plant.
Never permit an aloe vera plant to sit in water. The roots will end up rotting and it will kill the plant.